Pages

Showing posts with label Craft. Show all posts

Wednesday, March 5, 2014

10 Creative Ways to Hang Your Dress on Your Wedding day!

 I wanted to share different and even more cretive ideas to hang the dresses on your big day other than the wire hanger


I will be using wooden hangers with wire names on them for each of my bridesmaids (I will be posting a "tutorial" on those soon :), but that is not the only option for you. Read up and get some creative ideas from here!
 
1. Add a little something to a wooden hanger. It doesn't necessarily have to have a wire name on it, but it would still be cute to add a little detail like shells, if you are having a beach wedding.
 
 
Via Google

Or feathers and some bling
Via Google


I can't find the link for this one either. If you know, please let me know

 
2. Get a regular wooden hanger and carve s cute word on it like the one below.
 
I can't rememeber where I found this picture

3. Paint the wooden hanger white for the bride (with an added fabric flower), and black and white for the groom! What a neat idea. I especially love the tiny bow tie!
 
 
Via Google


And how about this for your bridesmaids? A white hanger with an awesome painting.. And we can't forget about the bow!

Via Google
4. This is a completely different, yet cool idea for the laid back bride having a burlap and mason jar wedding. It looks so easy to make! Just wrap some yarn around a hanger making sure it looks neat and it is glued in place. And then just glue some lace and burlap florets. You could also add the tag for each one of your girls.


Via Google

This one is very similar to the one above, except it's got a very feminine side to it with the "bride" meade out of pearls.


Via Google


 5. This is a very unique, yet easy to make hanger! Follow the link for the tutorial. I really like this one, even just as a regular hanger!


Via Google
 
This is another option very similar to the one above, except it has a brooch.. That could be your something old!
Via Google
 
6. This is so cute!!! Use a wire hanger and cove it in fabric. Even if you don't use it for the dress (because it is a wire hanger) you could use it for the undergarment. Or you could replace the wire hanger by a wooden one.
 
Via Google
 
Here are similar options with different fabrics
Via Google

And here is one with some trim! and monogrammed fabric
Via Google
 
This one is a very simple one
Via Google


7. This is one of my favorite ones!!! Although, I don't know how the hearts would be visible if the dress was hanging on it. Regardless, it would be perfect for a rustic wedding! And it doesn't seem too diffivult to make.

Via Google
 
8. This is also a great one for the bride with a funkier side and that wouldn't mind getting glitter on ther dress!!! Although, if I were to make this, I would make sure to seal the glitter with tons of clear spray paint!!

Via Google

9. I looooove this one! It looks so classy and elegant! Paint a wooden hanger in white/ivory and glue pearls in a neat pattern. The wire name is optional.

Via Google
This seems like an easier and less time consuming option!
Via Google
10. This is a great option for those of us that don't have time to craft 8 hangers, or want to let the dress to the talking. These wire hangers are pretty alone, but the tag and lace really adds something else. 
Via Google


And finally, I didn't want to add this one as an option, since they are sold on etsy (check out the link for the store under the picture)
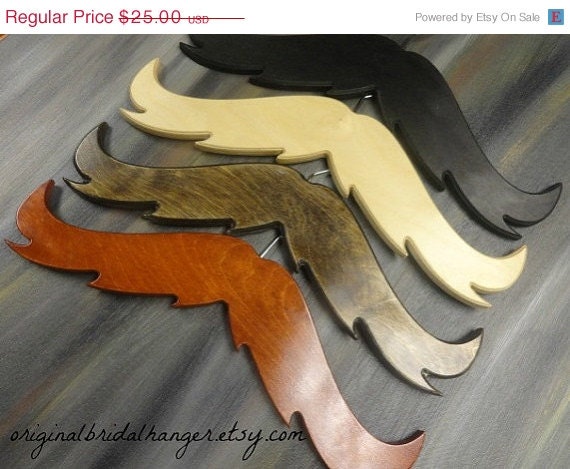
Via this fabulous Etsy Store!! Go check it out
Aren't these cool? They are so different and original. Definitely not for your average bride.
 
 
Well, I hope you enjoyed some of these ideas and maybe sparked some of your own!
 
Subscribe if you liked this post or if you are interested in getting a tutorial for DIY your own wire name hangers!
 
Happy crafting :)
 
Aranza


Monday, January 27, 2014

DIY: Fabric Flower Tutorial


Today I have a tutorial to share on how to make a different kind of fabric flower.
These are more like a tight rose (The one on the far right in the picture above)

This is a VERY poor picture of what the rosette looks like (without the beads and in VERY POOR LIGHTING!!)


What you will need is:
An embroidery hoop (as long as it's bigger than the diameter of your flowers, it's all good)
A pen
About 1/4 yard of fabric (silk taffeta, or any heavier fabric recommended)
Clear thread (or same color as fabric) and needle
Measuring tape and scissors.

Start by drawing a circle on the fabric as big as you want the flower to be. Proceed by putting enough fabric through the embroidery hoop  and tightening it!


With the remaining fabric cut a strip of fabric about 2" wide by 2" long (that is about what you need for a 1.5" flower). It is better to cut the strip too long than too short. You can always cut the excess, but is very difficult adding legth to it.


Proceed by making a 5 point "star" on your embroidery hoop with the clear thread.. Please refer to the picture below. The thread should meet in the middle and then go out in five different spots around the edge of the circle

Grab the long piece fabric and secure it to the middle with the thread and needle.


This is where the tricky part begins. Pul the fabric strip over one of the divisions of thread and then under the next one. Continue going over and under around the circle until you run out of fabric.


Once you are out of fabric, add random stitches all over the flower to keep it in place.. Cut around the circle and tuck the edges into the flower. I sometimes also add fabric glue in between the rosette and the fabric that was secured by the embroidery hoop.

And ta-dah!!


Click here to learn how to make the rest of the flowers and follow me to learn how to make the garter pictured above

Do you know how to make other fabric flowers?
Aranza

Friday, January 24, 2014

DIY: Wedding Day Garter Tutorial.

Welcome friends from Pinterest!! Leave a sweet comment and subscribe if you like this tutorial


Even though we are not tossing a garter at the reception, I still wanted to have one for Ace to take off later.

So, I decided to make one!

I had seen this picture on Pinterest and I really liked the fact that it was lace and not just elastic with satin fabric.

Via Pinterest

You will need:
Stretch lace trim (I got mine at hobby lobby).
Three fabric flowers and extra fabric that matches the flowers
Small beads
Clear/white/ivory thread (and needle)

To begin, measure your thigh and cut your lace trim 1" shorter than this.
Sew the edges together by overlapping 1" of the lace and doing a zig zag over the raw edges. Like so...


Now it's time for the fun part!


Gather your fabric flowers and decide how you want to arrange them. Learn how to make these fabric flowers here and here. I added gold beads to the center of my flowers. 

I took a picture of how I wanted to arrange them (I ended up changing the arrangement, but that helped me have an idea for when I sewed them on).


Pin the flowers in place and sew a couple of stitch to keep them in place.


Later on, I added a few fabric "petals" under one of the flowers. 


And more beads directly onto the lace in the shape of a leaf.
And tadah! You are done :)


If I were to throw my garter, I would probably make a second one, but without the bling; the bling was very time consuming

God bless,
Aranza


Wednesday, January 22, 2014

DIY: Will you be my bridesmaid invitation


You guys know that I'm engaged, so part of the wedding planning process was asking my best friends to be a part of the happiest day of my life!

I didn't want to just go up and ask them. I wanted to ask them in a more personal, and thoughtful way. 

So, I surfed the web for different ideas on how to do this, and I found a few cute one, but none of them were hitting the mark.

Will You Be My Bridesmaid/maid of honor?
Too simple
Will you be my bridesmaid?
Again, too simple

can't say i do without you...perhaps thinking differently, a little something to give your groom before the wedding....a gift, a note etc
I loved the idea of a treasure box, but I had to make 7 of them


So, when I saw these little dress boxes at goodwill (apparently, they are from the dollar store), I was flooded with ideas!

And this is what I came up with.

I liked the idea of giving them a fabric swatch for my wedding colors (which are constantly changing hehehe), so I decided to make a flower out of them.


I started by cutting many circles in my wedding colors. To make the "flowers" I folded each circle in 4 and run the corners through my sewing machine one after the other. I ended up with a string of 8 or so little circles (that looked more like triangles now). Then, I formed the shape of the flower and secured them in place (stitches or glue)


I made 7 of these "flowers" (I have 7 bridesmais)


Then I moved onto the little dresses.
I cut a square about 2 inches bigger all around than the cardboard dress form. I went to my sewing machine and sewed through the waist part of the dress gathering the fabric as I went. It took me about 5 minutes to sew all of them.

To finish them off, I tucked the sides of the dress in and hot glued them in place (to avoid as many fraying edges as possible.

This is what it looked like at this point (except without the ribbon.. thats where the gathering happened)


I glued the top of the dresses and cut the sweetheart shape.
Added the ribbon/lace, and then I moved on to the insides!


I basically just glued a personalized "letter" (which I found online) asking them to be my bridesmaids.. and, of couse, I couldn't forget the ring!