Pages

Thursday, November 13, 2014

Our First Home: The Kitchen Table Makeover and how to Remove Carving on Wooden Chairs


Ace and I have been living at an on-campus apartment for about 3 months now, and it has been wonderful!

I love living in a community like this and the fact that Andrew can come home between class and work breaks is awesome; it makes for countless cooking sessions together.


Today, I wanted to share the transformation our kitchen table took once we got married. This table was a gracious gift from my in-laws. They got it used about 20 years ago (it was already beat up by the time they got it and it had already lost the leaf/extension attachment then) and somehow two chairs got lost.


This is what the top looked like before the transformation (after I sanded it down some)


And this is what the chairs looked like before- with an engraved design on the back rest  


Even tough I tried really hard to like the design on the chairs, it just didn't work for me. So I took it upon myself to find a solution and, besides the "sand it down back to a smooth surface with a lot of patience and elbow grease" tutorial found online, there was no answer.


Ace and I started sanding the chairs to prep them for the first layer of paint. We gave up within 10 minutes and decided to prime them instead. We spray painted them white (It took about 1.5 cans per chair- it was quite windy), and continued to run out of paint. So, while looking for yet another can of paint at my in-laws, I came across this Speckling container- and a light bulb went on! 


I spackled a thin layer and made sure to smooth it out, let it dry and repeated the process two or three more times until the surface was completely covered. 


The chairs were left in the garage to dry overnight. I gave them a *light* sanding the following day (to smooth out the surface), but the scrolling was still visible. 


The answer for that was another coat of paint! And this was the final result.


Don't be fooled. It still took a lot of patience and *perfect* weather for this to happen.

Ace and I picked a fabric of our liking and recovered the chair seats (I didn't take pictures of this process as there is already tons of tutorials online).

The table was another monster to tackle. Sanding the table legs took me about 2 hours... Yup! My hands were camped for hours afterwards and I also had to take quite a few breaks.


The legs received 3-4 coats of white matte paint from a Home Depot sample and it was more than enough.


The top of the table received a special treatment with a base of white wash (I applied two coats with a rag- don't be afraid to leave a thick layer, otherwise it will take more coats for the white to show up). I followed the instructions on both of these containers and sanded the table lightly between coats.


I let it dry overnight and then applied 3 coats of Walnut Express Color with another rag. This is what it looked like after one coat (Sorry, I didn't take any picture with the white wash alone but, imagine this without any of the brown- it looked like a white/ivory table)


After the second coat


And the final product after the 3rd coat. I made sure to cover the edges properly and tried to get rid of any drips after each layer.


I was very generous with the stain and applied it in the *direction of the grain* (that's not true, as you can see in the "before" picture at the top of the post, this table had a weird union jack design on the top. So, when I applied the white wash and brown stain, I made sure to apply it in long stroked going the long way to fake my way into "regular" grain).


After everything was said and done and the table top and legs had dried overnight, I added 2 layers of polycrylic with a brush. This was the top while drying


And this is what it looks like in our new home!!


What do you all think?

Tuesday, September 9, 2014

Being a wife


P.S this happened
It is more than I ever expected.
It is somewhat of a roller coaster of emotions: Being in love with Ace, yet missing my parents; the excitement of living at a University campus, yet missing my hometown (and friends)!

And if you know me, you know I don't like roller coasters!
I know people want to hear about the wedding, and let me tell you-it was awesome!!!!! But, that is only one day of our lives (although quite a day!), and today I want to share about what comes after the wedding day- marriage. I will share about the wedding day, but that will be for another day!


Even tough Ace and I have been married for 2.5 months, we have only been living in our apartment (at the University) for the last two weeks. Let me tell you- I love it!!! I love having our own place to call home (although both of our parents' houses will always be home) and living with my best friend in the whole wide world. I love falling asleep in his arms and waking up next to him every morning. 

I love the fact that there is a fitness center within walking distance of our apartment and that the walk is always so pretty!! This campus is awesome! Yet, because of Ace's masters program, we do spend quite some time apart. Which leads me to the loneliness of living at a University campus and not being a student.

I think that has been the toughest transition, but it has definitely taught me a lot about myself. First off, meeting people (aside for Ace's friends) has become a challenge because there really aren't many opportunities to do so. When I do meet someone, they automatically assume that, because I'm around, I must be a student. Regardless, I've taken it upon myself to greet every person I see during the day! And 98% of the time, I get a greeting back :)

It has also been difficult because we have been coming back to our hometown/home church every weekend (I want to continue to serve at the high school ministry until the end of this school year), so there isn't too much time for us to hang out with people during the weekends (or during the week).

(My awesome parents- picture taken by my iphone, hence the poor quality)

Regardless, the joy and goodness far outweighs anything mentioned above; we are really enjoying this season of our lives. The Lord has been too good to us. And I love having sooo many neighbors hehe 

He has continuously reminded me that He is present in our lives and marriage. He has blessed us tremendously through all of our friends and family: our home is fully furnished thanks to them! (and thans to some other random people)  There are some days in which I feel so overwhelmed by His goodness that I can't help but keep certain songs on repeat (sorry neighbors!!).

Until next time,
be blessed

P.S. This happened last week! (yup! that's milk all over our coffee station and Ace's guitar case.. woop!) I think I'll leave the coffee making to Ace! He is quite the cappuccino crafter!


Sunday, June 8, 2014

A Piece of my Heart a week before my Wedding Day

          Part of my New Years resolution is becoming comfortable with being vulnerable. I tend to be uncomrotable with vulnerability because it shows your emotions, and my emotions change by the minute! 
So then I become afraid that people would hold those emotions (shared in moments of vulnerability) against me. 
Well, today I will break that pattern. One of the reasons being that I won't be able to relive this part of my life and I would like to share my feeling.

         For the past year (of engagement to Andrew) I have faced a roler coaster of emotions. They mainly range from super extating, to being patient, to being anxious and then again to being excited.
I'm sure more than one person can relate to those feelings before a big day/event/trip, etc.

Well, as I sit here listening to Oceans by Hilsong, I can't help but rejoice in the knowledge that The Lord has my future in His hands. There is no uncertainty there, that fact won't change based on my feelings.

         For the last 21 years (almost 22) the place I've called home has been wherever my parents/sibiling have recided. For the past 5 years, I've slowly considered Andew's house a home, but I've never actually lived there. I've never really lived outside my parents' house (aside for a short 3-month internship a couple of summers ago) in my life! That's about to change in 7 days! 7 short days.. It seems so surreal!!! It's frightening (It will be a HUGE change), yet the excitement overtakes any other emotion.

         After five years of waiting and dreaming with Andrew, the day is finally here and I couldn't be more excited! There is anxiousness insisde of me, yet there is peace (that surpases my undersanding for sure). The Lord is definitely leading me to a place in which my faith has never been before. 

I know he has called both, Andrew and I into this marriage and a life-long devotion to Him and His Kingdom.

So Lord, take me deeper than my feet could ever wonder for I know that when Andrew and I call upon Your Name, You are there.

God bless,
Aranza

Sunday, May 18, 2014

DIY Fresh Flower Necklace Tutorial


I recently got the opportunity to make anythjng in one of my floral classes and I was pumped!!
I decided to make this necklace and wear it the following day (it's a night class)


And I lived it! And so did many people I encountered that day..
Annnnd, since I've abandoned my blog lately (sorry, classes, finals and wedding planning!), I thought a tutorial for this would be a great way to get back and share something I'm passionate about.

I started with  long piece of (14 gauge?) wire, made a "moon" shape (as seen in the picture) and used that as an armature for the necklace. 


I added leaves on the "back" side of the necklace so there would be a base (I used cold glue to attach them, as seen in the picture above). This is what it looked like from the back: 


I made sure to have a loop on one of the "moon" ends, and a hook on the other end of the wire, like so:


I laid the necklace with the shiny side of the leaves facing down (that would be the part against my skin so the wire wouldn't scratch), place the flowers where I wanted them to be and then I glued them with some more cold glue!


I added some pearls and was done!


I paired it with a white lace dress my brother and his fiancée gave me for Christmas 


A matching belt


And the shoes I recovered (with floral print) and that u wore the day Andrew proposed!

I hoped you liked the tutorial :)
If you did, please share it, subscribe, pin it, and vote for it on chictopia (here:http://www.chictopia.com/photo/show/1023366-Handmade+Fresh+Flower+Necklace-white-lace-dress just click the +1 button)

Thanks!

Wednesday, March 5, 2014

10 Creative Ways to Hang Your Dress on Your Wedding day!

 I wanted to share different and even more cretive ideas to hang the dresses on your big day other than the wire hanger


I will be using wooden hangers with wire names on them for each of my bridesmaids (I will be posting a "tutorial" on those soon :), but that is not the only option for you. Read up and get some creative ideas from here!
 
1. Add a little something to a wooden hanger. It doesn't necessarily have to have a wire name on it, but it would still be cute to add a little detail like shells, if you are having a beach wedding.
 
 
Via Google

Or feathers and some bling
Via Google


I can't find the link for this one either. If you know, please let me know

 
2. Get a regular wooden hanger and carve s cute word on it like the one below.
 
I can't rememeber where I found this picture

3. Paint the wooden hanger white for the bride (with an added fabric flower), and black and white for the groom! What a neat idea. I especially love the tiny bow tie!
 
 
Via Google


And how about this for your bridesmaids? A white hanger with an awesome painting.. And we can't forget about the bow!

Via Google
4. This is a completely different, yet cool idea for the laid back bride having a burlap and mason jar wedding. It looks so easy to make! Just wrap some yarn around a hanger making sure it looks neat and it is glued in place. And then just glue some lace and burlap florets. You could also add the tag for each one of your girls.


Via Google

This one is very similar to the one above, except it's got a very feminine side to it with the "bride" meade out of pearls.


Via Google


 5. This is a very unique, yet easy to make hanger! Follow the link for the tutorial. I really like this one, even just as a regular hanger!


Via Google
 
This is another option very similar to the one above, except it has a brooch.. That could be your something old!
Via Google
 
6. This is so cute!!! Use a wire hanger and cove it in fabric. Even if you don't use it for the dress (because it is a wire hanger) you could use it for the undergarment. Or you could replace the wire hanger by a wooden one.
 
Via Google
 
Here are similar options with different fabrics
Via Google

And here is one with some trim! and monogrammed fabric
Via Google
 
This one is a very simple one
Via Google


7. This is one of my favorite ones!!! Although, I don't know how the hearts would be visible if the dress was hanging on it. Regardless, it would be perfect for a rustic wedding! And it doesn't seem too diffivult to make.

Via Google
 
8. This is also a great one for the bride with a funkier side and that wouldn't mind getting glitter on ther dress!!! Although, if I were to make this, I would make sure to seal the glitter with tons of clear spray paint!!

Via Google

9. I looooove this one! It looks so classy and elegant! Paint a wooden hanger in white/ivory and glue pearls in a neat pattern. The wire name is optional.

Via Google
This seems like an easier and less time consuming option!
Via Google
10. This is a great option for those of us that don't have time to craft 8 hangers, or want to let the dress to the talking. These wire hangers are pretty alone, but the tag and lace really adds something else. 
Via Google


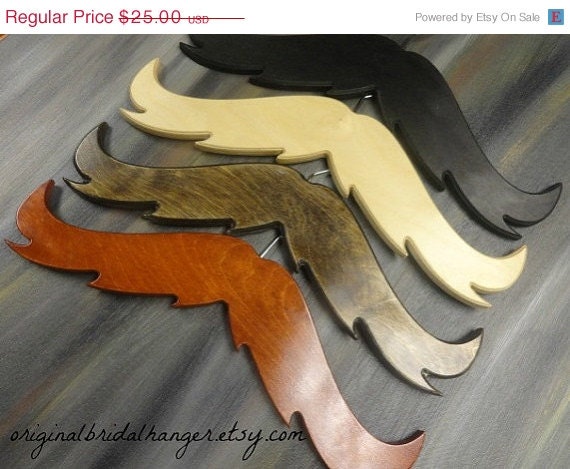
And finally, I didn't want to add this one as an option, since they are sold on etsy (check out the link for the store under the picture)

Via this fabulous Etsy Store!! Go check it out
Aren't these cool? They are so different and original. Definitely not for your average bride.
 
 
Well, I hope you enjoyed some of these ideas and maybe sparked some of your own!
 
Subscribe if you liked this post or if you are interested in getting a tutorial for DIY your own wire name hangers!
 
Happy crafting :)
 
Aranza